Setting Up the ODBC Connection
For new installations, after the database server is configured the ODBC connection must be set up. This connection allows the client database to communicate with the Galileo or Apollo data source.
For updates of existing installations, confirm that the ODBC connection is working properly.
Note: This setup is not required for Travelport Booking Feed configurations that receive a direct XML log feed, which requires no database or ODBC connection.
The instructions for this also task vary depending on the operating system. This section provides instructions for setting up the ODBC connection in both 32‐ and 64‐bit operating systems.
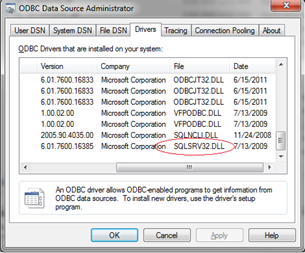
Setting Up the ODBC Connection in a 64‐Bit Operating System
Due to a deficiency in the Microsoft 64‐bit ODBC driver, Microsoft recommends that the ODBC system DSN should be run using 32‐bit ODBC drivers. Using the 32‐bit drivers will eliminate errors received in the Travelport Booking Feed console and logs that indicate ODBC driver errors.
To set up the ODBC connection in a 64‐bit operating system:
Microsoft recommends that you DO NOT use the Data Source configuration tools normally found in Administration Tools. Instead, run the ODBC configuration tool, which is typically found in C:\Windows\SysWOW64\odbcad32.exe. When opened, this tool defaults to Windows 32‐bit ODBC driver, SQLSRV32.DLL.
After running the executable for the 32‐bit driver, the DSN can be configured using the same parameters provided in the following instructions for 32‐bit operating systems. Skip Steps 1–3 in Setting Up the ODBC Connection in a 32‐bit Operating System, and begin with Step 4 to ensure that you are configuring the 32‐bit driver. There are no additional changes required to configure the database and server for 64‐bit systems.
Setting Up the ODBC Connection in a 32‐bit Operating System
The following example sets up an ODBC connection for a machine that:
-
Runs SQL Server on the same machine as the Travelport Booking Feed Adapter.
-
Travelport Booking Feed client supports most Microsoft ODBC System DSN currently supported by Microsoft. Microsoft recommends using its 32-bit ODBC driver on 64-bit machines. Travelport Booking Feed supports most operating systems currently supported by Microsoft.
To set up the ODBC connection in a 32‐bit operating system:
-
From the Windows Start menu, open the Control Panel.
-
Double‐click the Administrative Tools icon to open the Administrative Tools folder.
-
Double‐click the Data Sources (ODBC) icon.
-
The ODBC Data Source Administrator window is displayed.
-
Select the System DSN tab.
-
Click Add. The Create New Data Source dialog box is displayed.
-
From the list of drivers, select SQL Server.
-
Click Finish to open the Create a New Data Source to SQL Server wizard.
-
In Name, enter the same name that you used enter for the ODBC Database Name field in the Travelport Booking Feed Application Properties window.
-
In Description, enter a description for this ODBC connection.
-
In Server, click the arrow to select the database server name. Unless the defaults were changed during the SQL Server database installation, this server will be the database machine name.
Note: If the database is running on the same machine as the Travelport Booking Feed Adapter, you can select (local).
-
Select the following depending on what type of authentication you will be using.
-
With Windows NT authentication using the network login ID. (Use this option if you are using Windows authentication.)
-
With SQL Server authentication using a login ID and password entered by the user. (Use this option if you need to log in to the database using SQL Authentication and follow steps below.)
-
Select the checkbox next to Connect to SQL Server to obtain default settings for the additional configuration options.
-
Enter your SQL Server Login ID and Password needed to log in to the database using SQL Server Authentication.
-
-
-
Click Next to display the database selection dialog box.
-
Select the Change the default database to option.
-
Click the drop‐down arrow to select your database.
-
Click Next to display the language and settings dialog box.
-
Select any additional options you require.
-
Click Finish to display a list of your selected configurations in the ODBC Microsoft SQL Server Setup window.
-
Confirm your settings, and then click Test Data Source to test your database connection. If the setup is successful, a confirmation is displayed.
-
Click Finish to display a list of your selected configurations in the ODBC Microsoft SQL Server Setup window.
-
Click OK on the ODBC Microsoft SQL Server Setup to complete the setup.
Note: The default ODBC name is GIDS.
Note: The default database name is GIDS, unless you modified the default settings when creating the database.